shipper: bitrix24 app

Create parcels and track the status of parcels directly in CRM

Connect you Bitrix24 with:

December 2023 Update

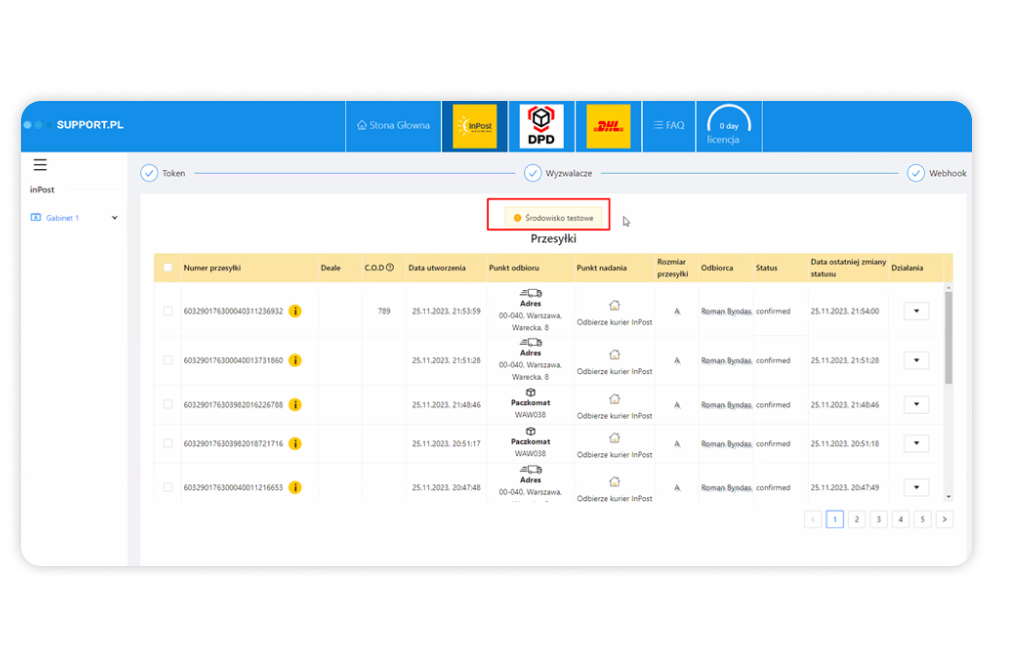
-Added a test mode to test the functionality of the application.
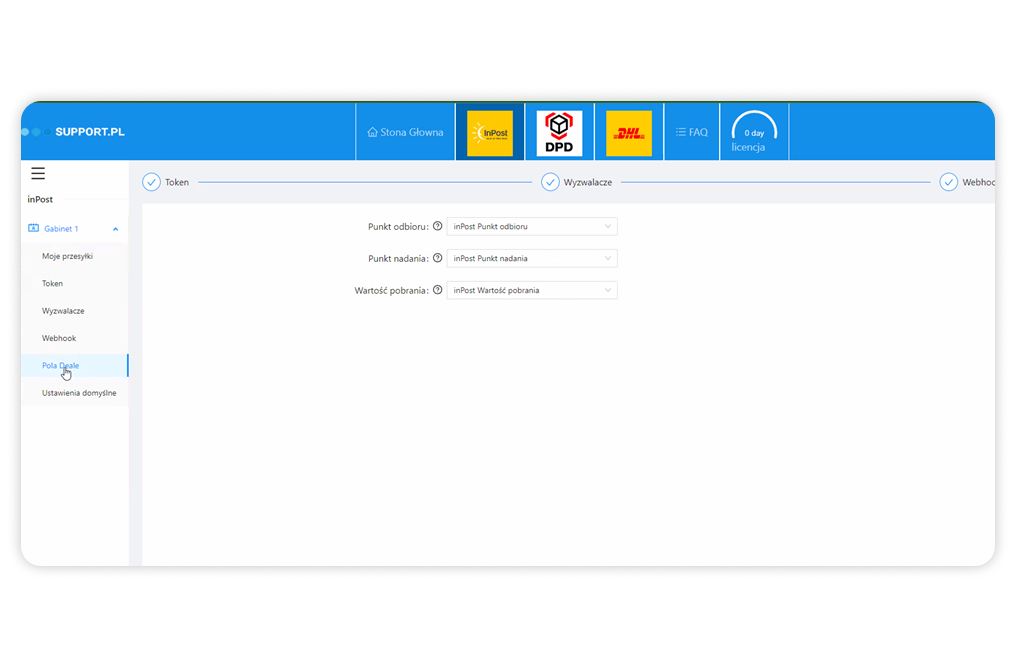
-Added fields in settings to specify delivery points with field synchronization with Bitrix24.
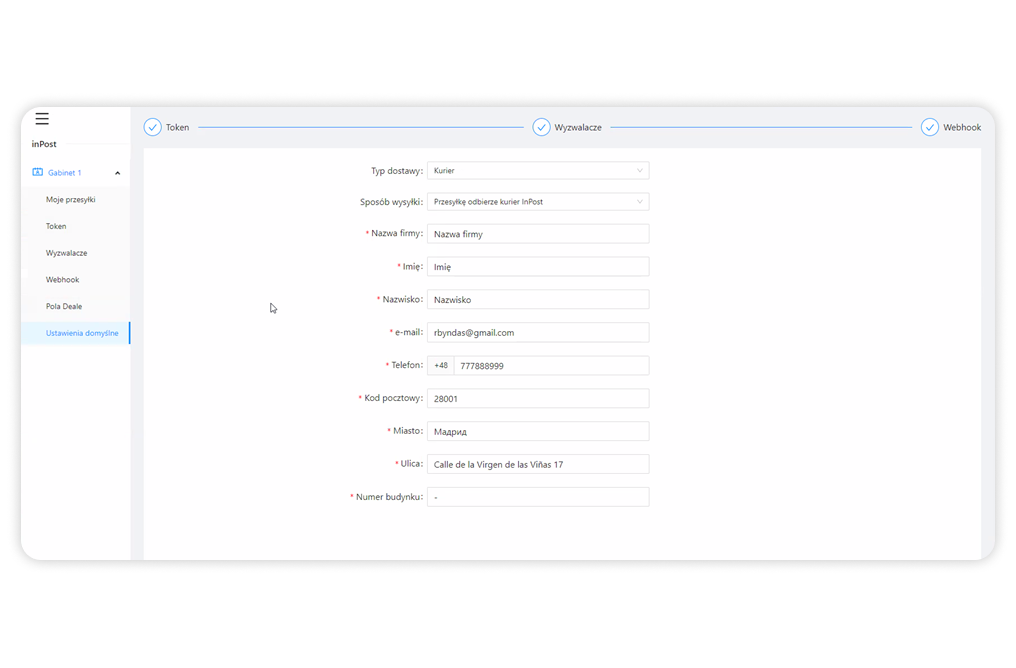
-Added the ability to add and change the shipper's address.
-Added and modified some ordering fields.

Additional Changes

-A unique "Parcel Number" is created for each parcel.
-Added the ability to print labels in A6 format, A4 format is also available.
-InPost statuses you can now use triggers that move transactions to the required stage (triggers are automatically created by Bitrix24).
-In the "Deals" menu, it is possible to configure which stage of the transaction an order should move to when a certain field is filled in.

application functionality


Connection between Deal and parcel


printing sticker for the parcel


Parcel status tracking


Synchronization of the parcel status with the stages of Deals in crm


Launching triggers at the Deals stages when updating parcel statuses (ex. clients notification)


View all shipments / deliveries 

How does the application work? 

Step 1.

Enter information about the parcel in Deal.After “Paying”, the Parcel in the Deal will receive its ID number and a file with a sticker will be generated. You can print it and attach it directly to the parcel.

Step 2.

Prepare the funnel and make the triggers work: connect the stages of the Deal with certain statuses of the parcel. When the shipment status changes, the Deal will automatically move to the new stage.

Done!

Next, the mechanism for tracking the status of the package will turn on, where, if it changes, the Deal will move to a new stage or notification will be sent.

+ control all your shipments

In the application you will see the entire list of parcels with detailed information, status and last modified date.

Synchronization with DHL and DPD services is under development. Updates will come soon! 

Find out more about installing and setting up via our knowledge base

14-day trial period

Install

simple installation

help and support

Instructions for setting up the application:

1. Sign up for InPost if you don't have an account yet.
2. Launch the Bitrix24 application.
3. Go to the InPost “Settings” tab. To synchronize applications, you will need a Token and an ID number, which you need to take in your InPost account.
Also, to track statuses, in the InPost account, API->Ustawienia organizacji->Address webhook, you must specify this address “https://shipper.app.support.pl/handlers/inpost/handler.php” for the webhook
To do this, follow the instructions directly in the application.
4. Paste the copied token and ID number into the field. Done!
5. Next, select the statuses of the parcels (synchronized with InPost) that you want to associate with the stages of the Deals (and also set up certain automatic actions (rules) on them later). How to use them is described below.

How to use the application?

1. Prepare the funnel: link the stages of the Deal with certain statuses of the package.
Go to the tab CRM - Deals - Automation rules. In the part with triggers, when adding a new one, select “Application Triggers” - there you will see all the added parcel statuses. Define a shipment status for each stage of the Deal, so that when the shipment status changes, the Deal will automatically move to the new stage.

2. Add a parcel to the Deal.
One Deal - One parcel. Create a new Deal (or use a ready one), open its profile and select the “Shipments” tab through the “More” button. Here you need to enter information about the parcel. Save.

The parcel was attached to the Deal. You can cancel it (until it is paid) (then you will return to filling in the data of the parcel) or pay. When you select the “Pay” action, the Parcel in the Deal will receive its ID number and a file with a sticker will be generated ( which is attached directly to the parcel).
Next, the mechanism for tracking the status of the parcel will turn on, where, if it changes, the Deal will move to a new stage (using the triggers configured in step 1).

3. To view all your shipments, you need to go to the application - the “My deliveries” tab. Here you will see the entire list of parcels with detailed information, status and last modified date.

HAVE ANY QUESTIONS? CONTACT US!

Tu załadowany zostanie formularz CRM

LET'S TALK ABOUT HOW BITRIX24 CAN HELP YOUR BUSINESS

Fill out the form and our specialists will give you professional advice tailored to your company's needs.

BITRIX24 APPS

Browse the catalog with ready-made solutions and integration modules

more apps here
We use cookies
Cookie preferences
Below you may find information about the purposes for which we and our partners use cookies and process data. You can exercise your preferences for processing, and/or see details on our partners' websites.
Analytical cookies Disable all
Functional cookies
Other cookies
We use cookies to personalize content and ads, to provide social media features and to analyze our traffic. Learn more about our cookie policy.
Change preferences Accept all
Cookies